
PyGTK CD Ripper Tutorial - Part 2
Part 1 of this pygtk tutorial stopped with a working toolbar and two place holders. But this is obviously not enough to create complicated UIs.
Enter gtk.Table
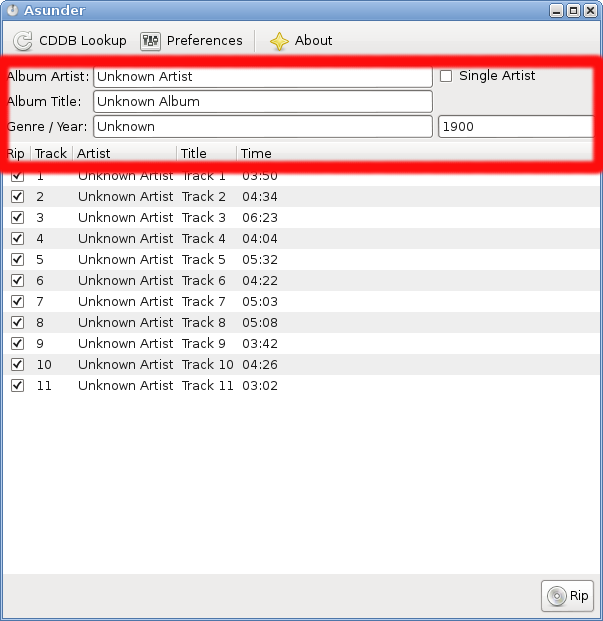
Tables allow packing multiple widgets together. The principle is quite simple. Think of a chess-board with coordinate system, and you can place different text areas, buttons and other widgets inside the place holders. Here is how a table with multiple labels, text widgets and a check button looks like this in asunder:
This table has 8 elements, in it, however its size is 3 by 3. Here is how this table is created:
album_table = gtk.Table(3, 3, False)
The 3 arguments (False) determines whether this table is homogeneous or
not. If set to True, all elements in the table will be the same size.
Then the table is added to the main window with packing:
vbox.pack_start(album_table)
The table is populated using the method:
table.attach(widget, left, right, top, bottom, xoptions,
             yoptions, xpadding, ypadding)
And the coordinate system start from the top left corner. Translated to
this coordinate system, the album info in asunder looks like that:
      0               1          2               3
    0 +---------------+----------+--------------+
      |  Artist label |  Text    | Check Button |
    1 +---------------+----------+--------------+
      |  Title label  |  Text    |  Empty       |
    2 +---------------+----------+--------------+
      |  Genere/Year  |  Text    |  Number      |
    3 +---------------+----------+--------------+
The table would then be populated with the first Widget like this:
    artist_label = gtk.Label('Album Artist:')
    album_table.attach(artist_label, 0, 1, 0, 1)
The text widget is also inserted:
    artist_name = gtk.Entry(128)
    artist_name.set_text("Unknown Artist")
Note that the gtk.Entry init method takes an integer as an argument.
This number specifies the letters allowed text in this box. 128 Letter
should be decent length to an album name.
After the gtk.Entry widget is created, the method set_text sets
the default text to displayed in the text area.
Next, a CheckButton widget is added in the top right corner:
    single_artist = gtk.CheckButton("Single Artist")
    album_table.attach(single_artist, 2, 3, 0, 1)
The gtk.CheckButton init method takes a String as an argument. This
string will be shown next to the check button. By now, the UI created
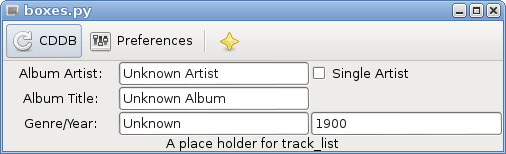
with table populated with 3 widgets looks like this:

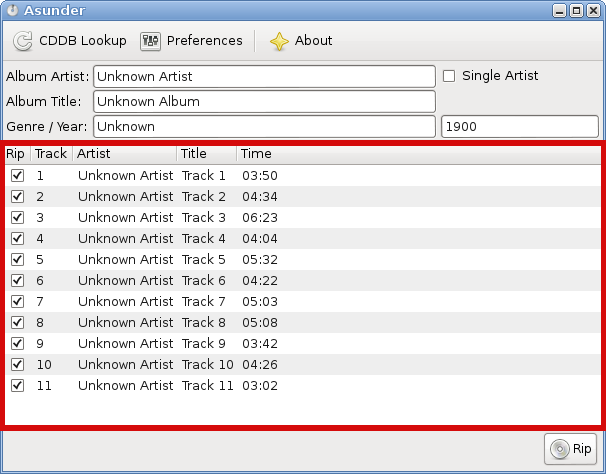
Packing the rest of the widget into the table is not so hard now. You can find the code that shows that in the table_complete tag, which will produce the following UI:
Now that the table containing the album information, it is time to look
on populating the list of tracks using two of the more complicated GTK
widgets, the TreeView and ListStore.
Creating complex TreeViews and ListStore in GTK
Asunder populated the list of album tracks inside a TreeView:
A TreeView expects a gtk.ListStore widget to be handed over when creating
it. Hence, before a TreeView can be created, a ListStore has to be created with
some thought on what has to be stored in it:
    # We begin with creating a ListStore
    liststore = gtk.ListStore(bool,int,str,str,str)
This list store has 5 items (which will be than translated to 5 columns in the
TreeView). The first item is of type bool, to indicate rip or skip; the
second is of type int to indicate track number; the third and fourth are both
strings to indicate the track artist and title respectively. The last item is
also a string, although a tracks length is actually a number.
After a gtk.ListStore is properly created with the correct fields to hold,
a new gtk.TreeView widget can be created:
treeview = gtk.TreeView(liststore)
The created widget is empty and has no columns; a column is add with
gtk.TreeViewColumn and attaching gtk.CellRendererText widget to it:
    rendererText = gtk.CellRendererText()
    column = gtk.TreeViewColumn("Rip", rendererText, text=0)
    column.set_sort_column_id(0)
    treeView.append_column(column)
The above code snipped has to be repeated for every column, hence it will not
be displayed here. Another thing to be noticed here, which is not inside the
scope of GTK programming, but rather in the scope of good coding, is the length
of the current __init__ function. If all the columns that need to be created,
are directly created inside the __init__ method, it will be a very long and
complicated to understand. This will make it hard to maintain and change later.
Hence, it is better to have a small method that wrapped all the code related to
making the columns inside a class method def create_columns(self, treeView).
Hence, the UI class will now look like:
class PunderUI():
    """
    Initial class to draw the first toolbar.
    """
    def help_dialog(self, widget):
      ...

    def create_columns(self, treeView):
        """
        create columns for treeview of track list
        """
        rendererText = gtk.CellRendererText()
        column = gtk.TreeViewColumn("Rip", rendererText, text=0)
        column.set_sort_column_id(0)
        treeView.append_column(column)
        ...

    def __init__(self):
        """
        create the gui using GTK Window, and Toolbar.
        """
        window = gtk.Window()
        window.set_default_size(500, -1)
        vbox = gtk.VBox()
        window.add(vbox)

        ...
        liststore = gtk.ListStore(bool,int,str,str,str)
        treeview = gtk.TreeView(liststore)
        ...
        # populate the treeview widget with columns
        self.create_columns(treeview)
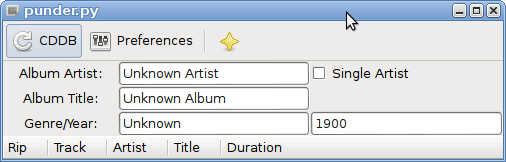
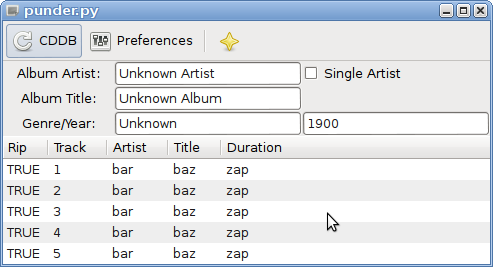
The result of populating treeview with columns is:
Since the ListStore object created earlier is empty, so is the TreeView.
Hence, it makes sense to populate liststore with some dummy data, just so
it will be visible. ListStore is populated with the method append which
takes an iterable as an argument. This iterable has to match in size the size
declared when creating the ListStore object. The items inside this iterable
should also match the types declared earlier:
    # dummy function
    for i in range(1,6):
       liststore.append([True,i,"bar","baz","zap"])
Put together, the above snippets create a poplluated ListStore inside a
TreeView:
The code to produce this UI can be found in the github brach simplified tree view. The UI is almost complete. However, there is more work to do. So, stay tuned for part tree.
Share this post: